
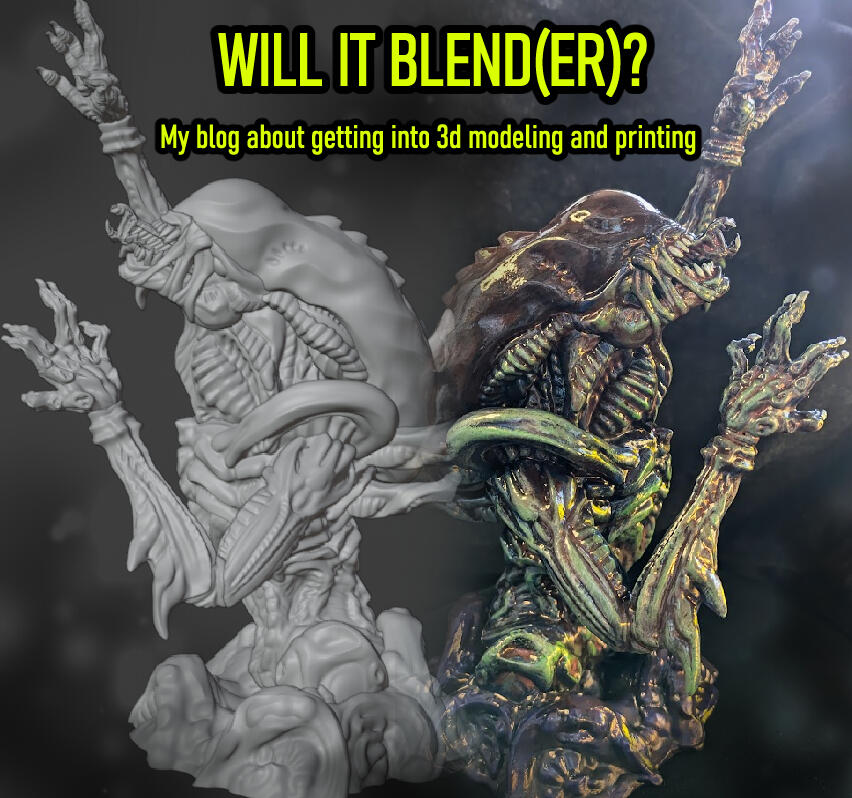
NEW BLOG WILL IT BLEND(ER)?
I got a 3D printer from a friend and after printing about three models from others I already had enough; I needed to learn to make this myself.So I did.
June 2025
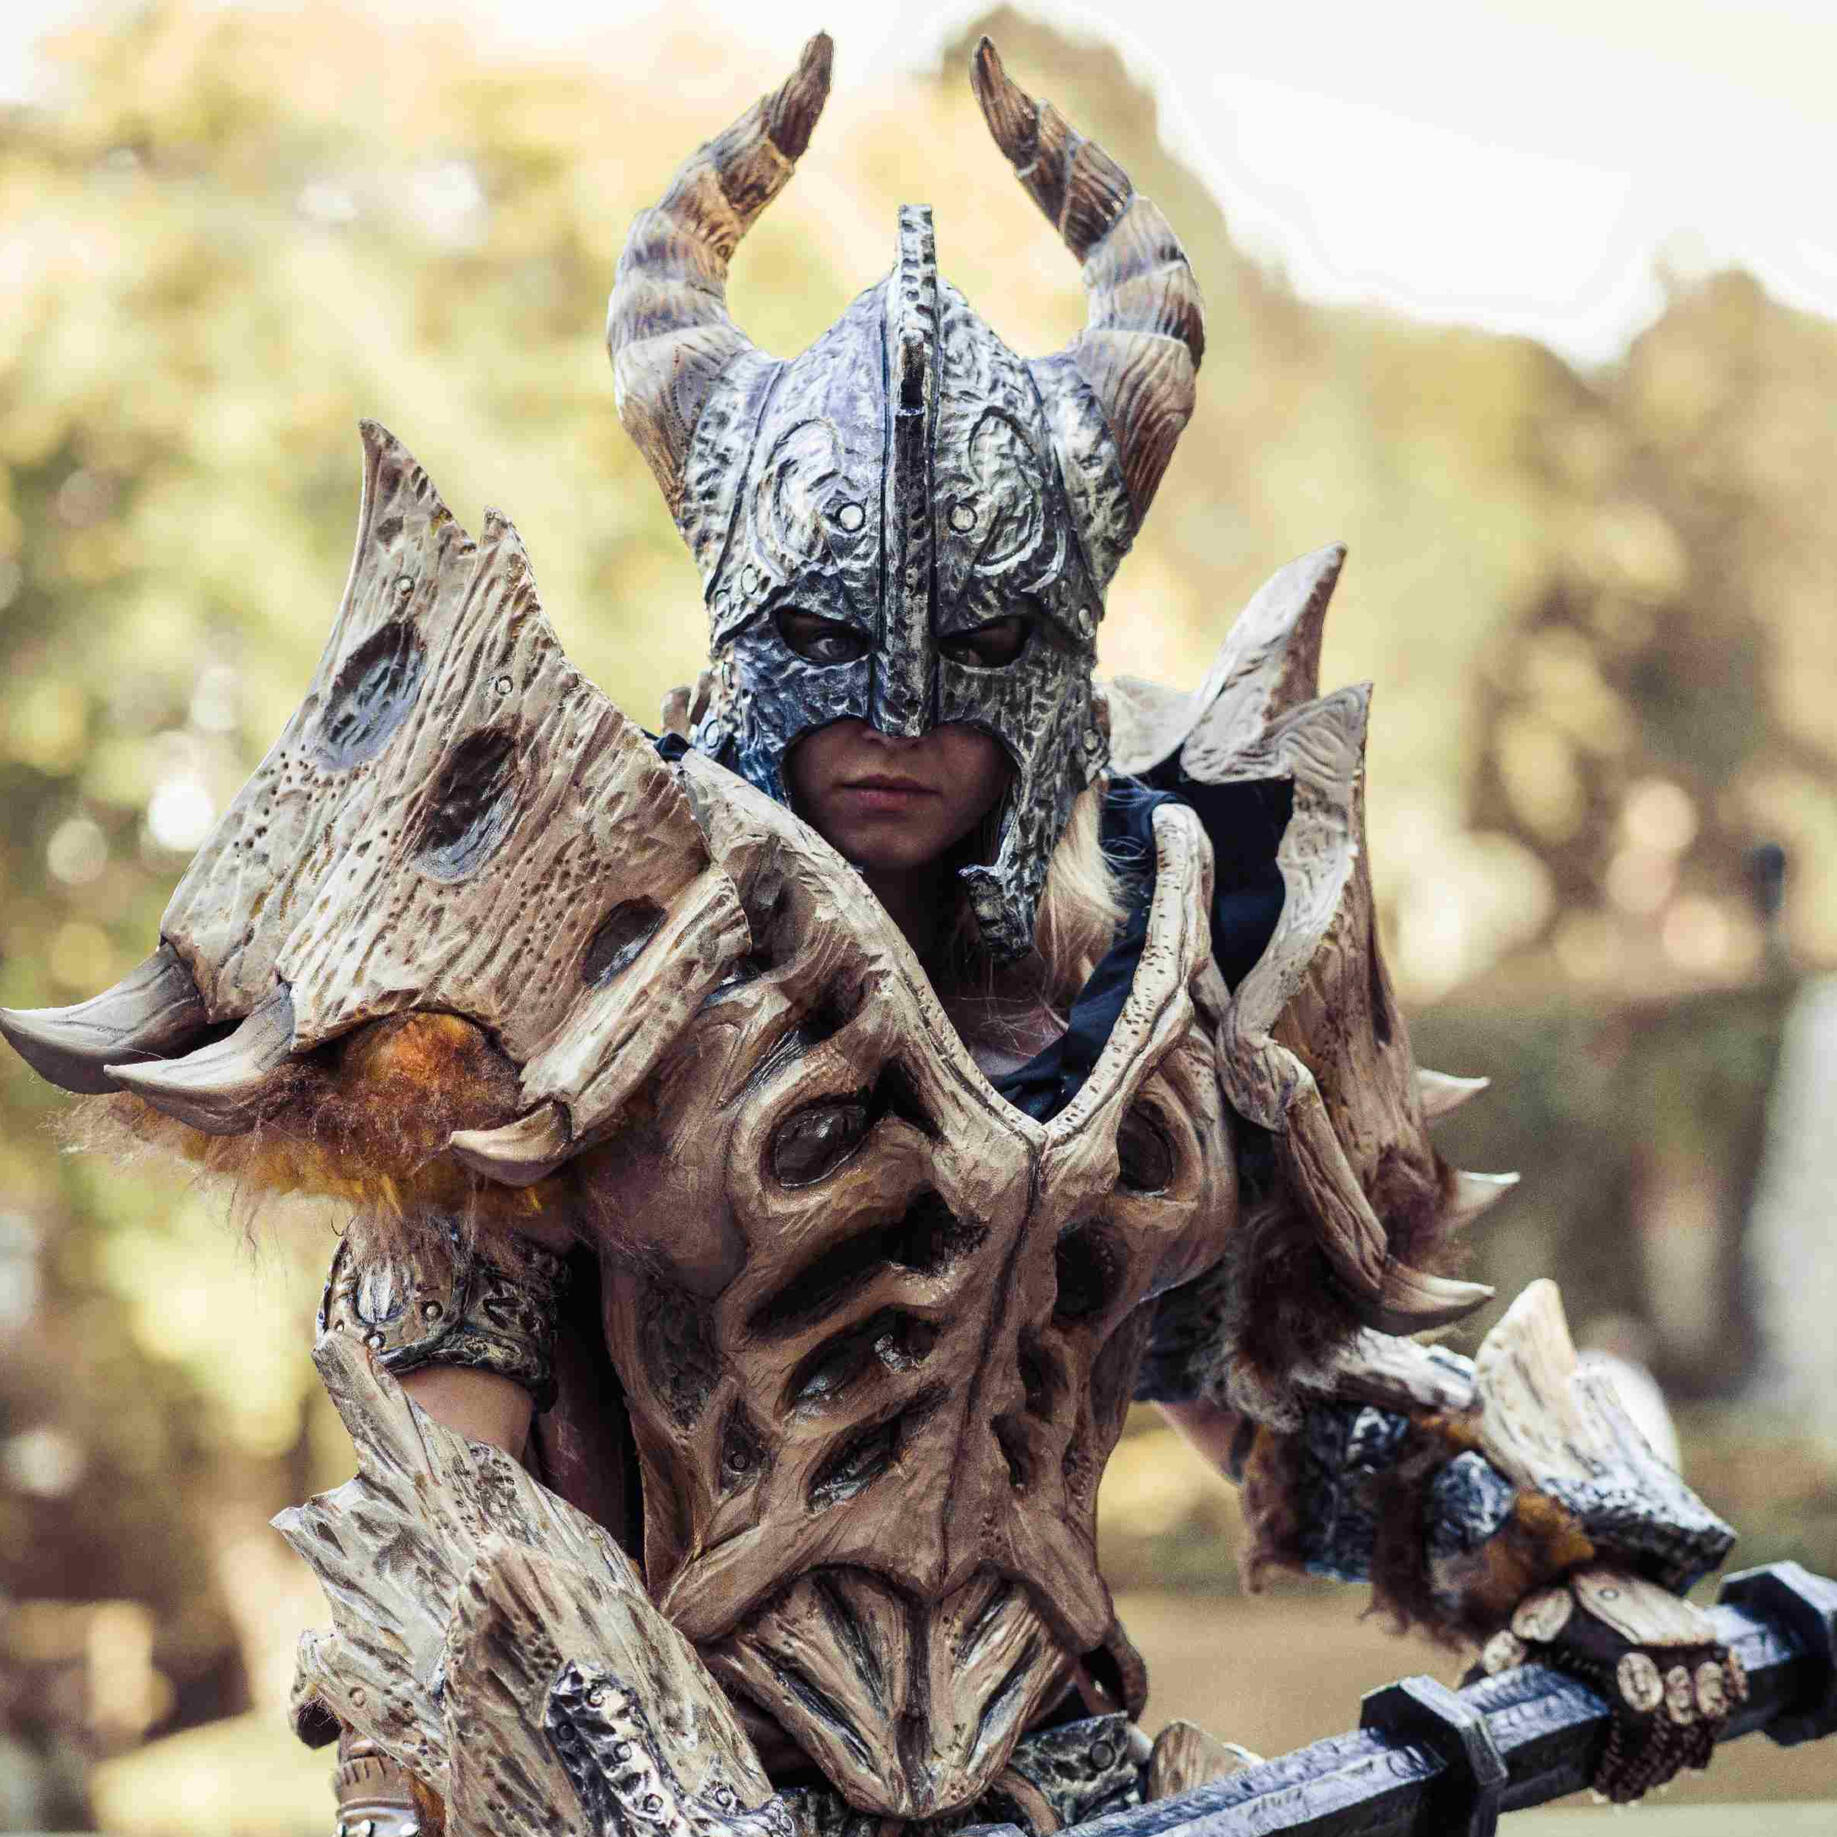
Making of the Dragonborn
Bethesda games. I might live in them. But something is missing... ah yes. Skyrim in real life.Turning the Dragonplate armor into reality!
May 2024
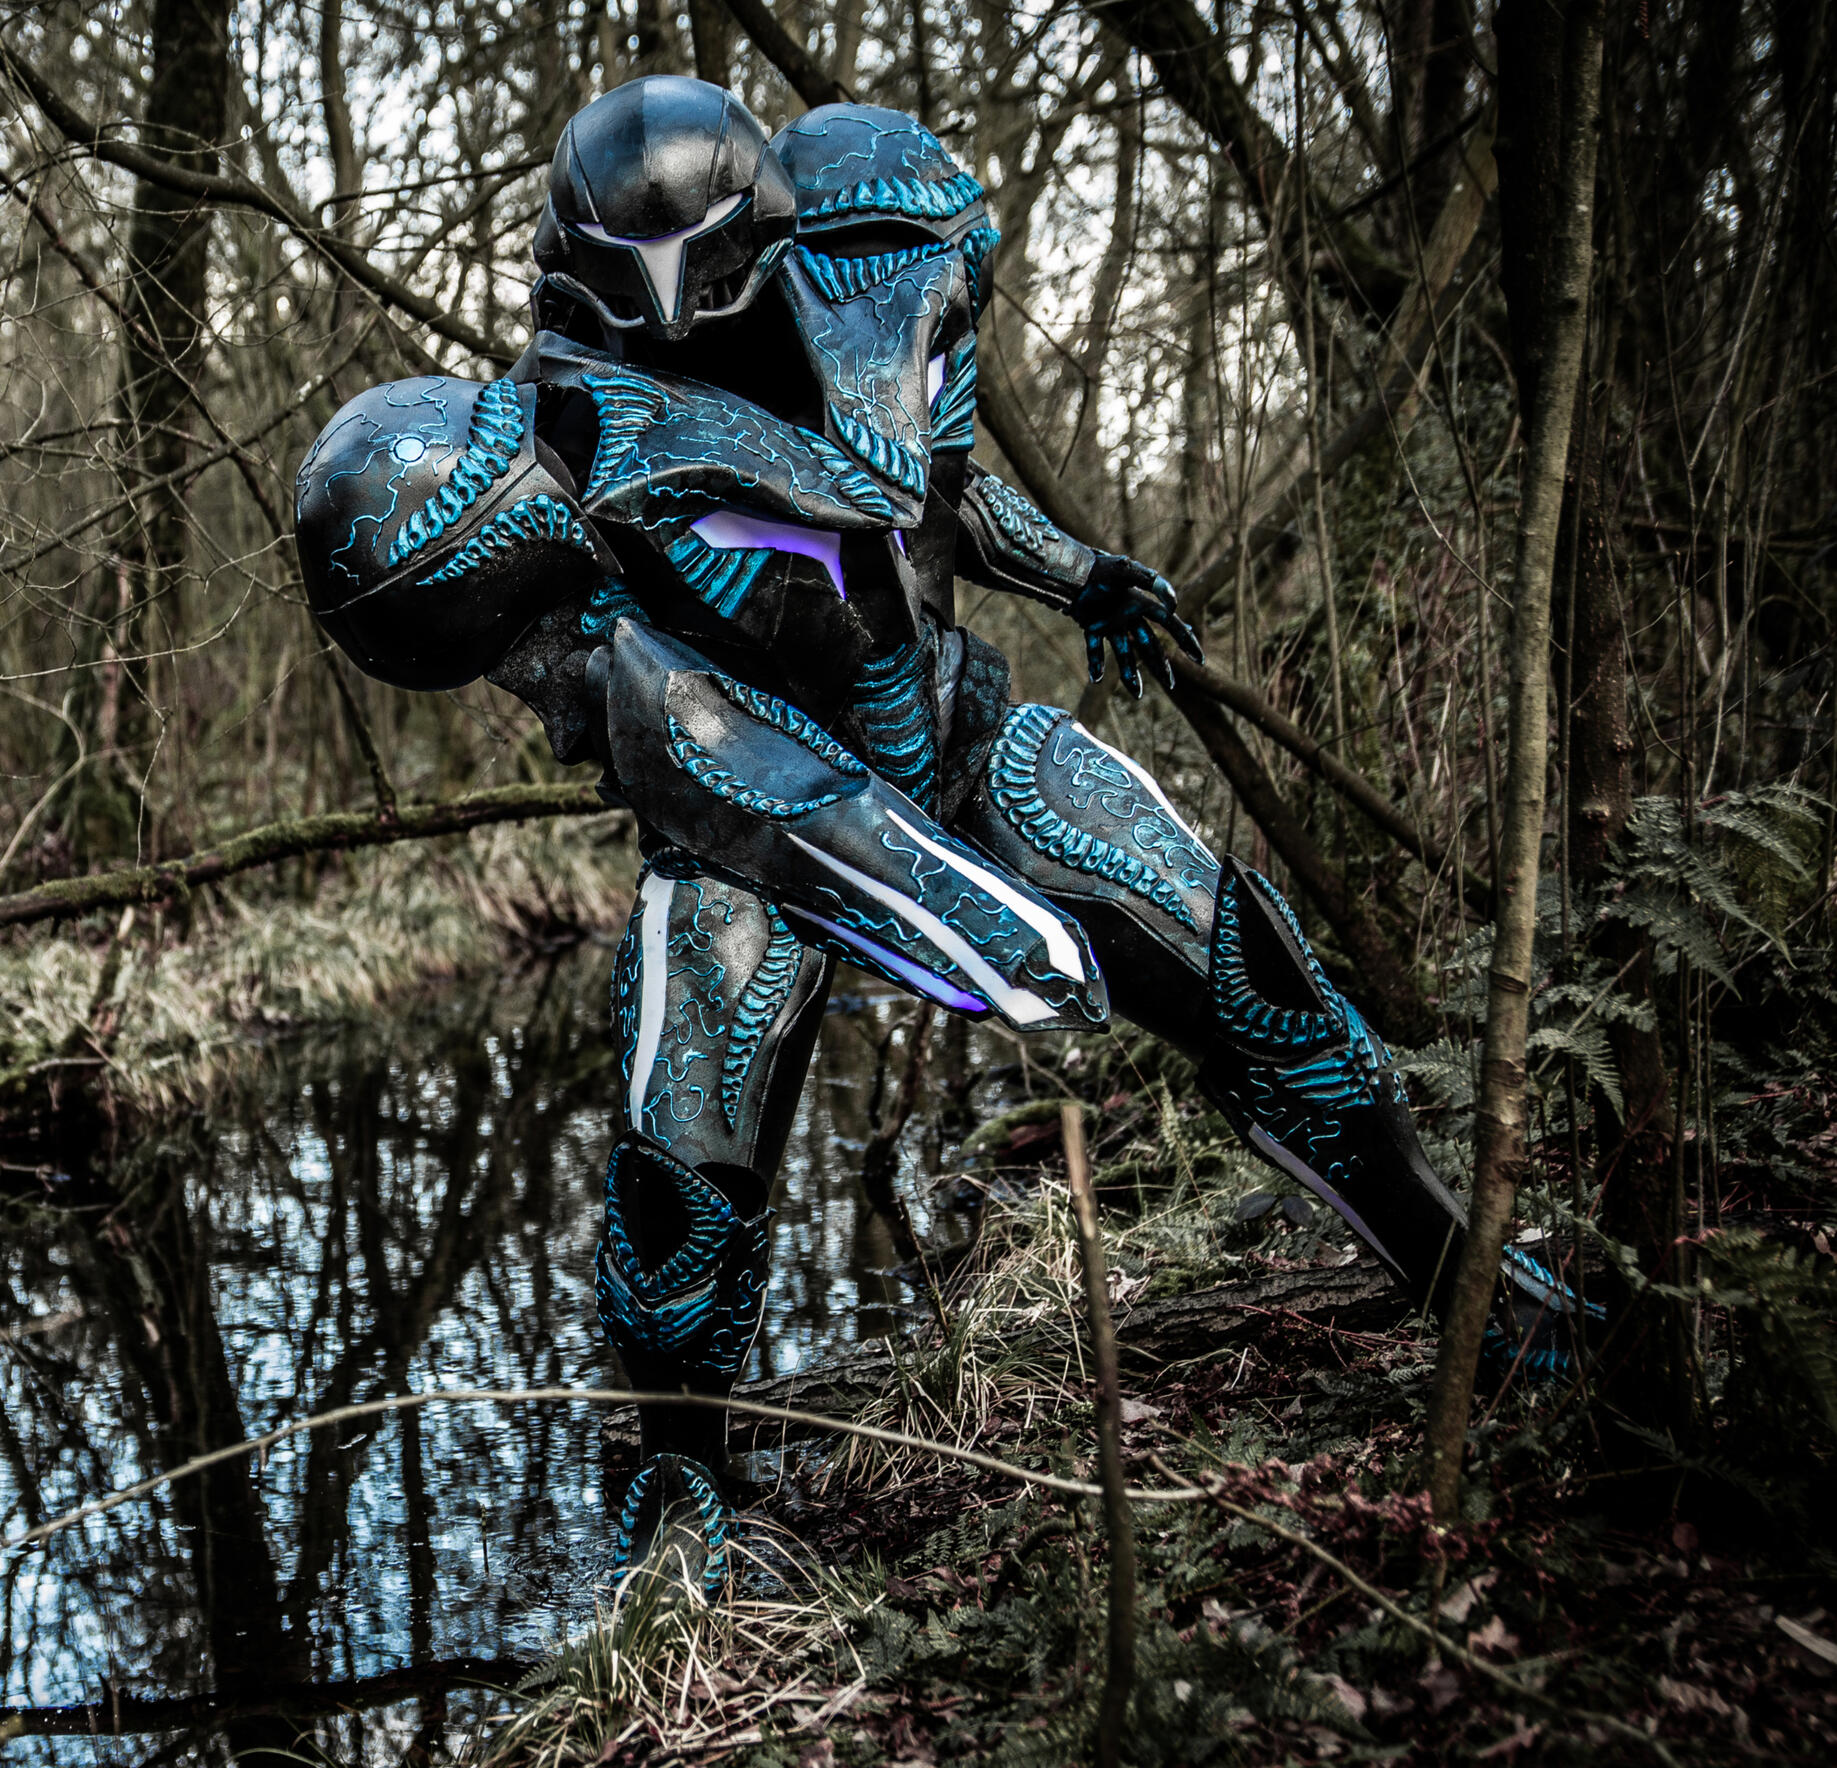
Making of Dark Samus
Loving Metroid, Dark Samus was never my number one favourite in the series.Until I made the costume and both the process and result propelled me into the internet spotlight.
May 2022
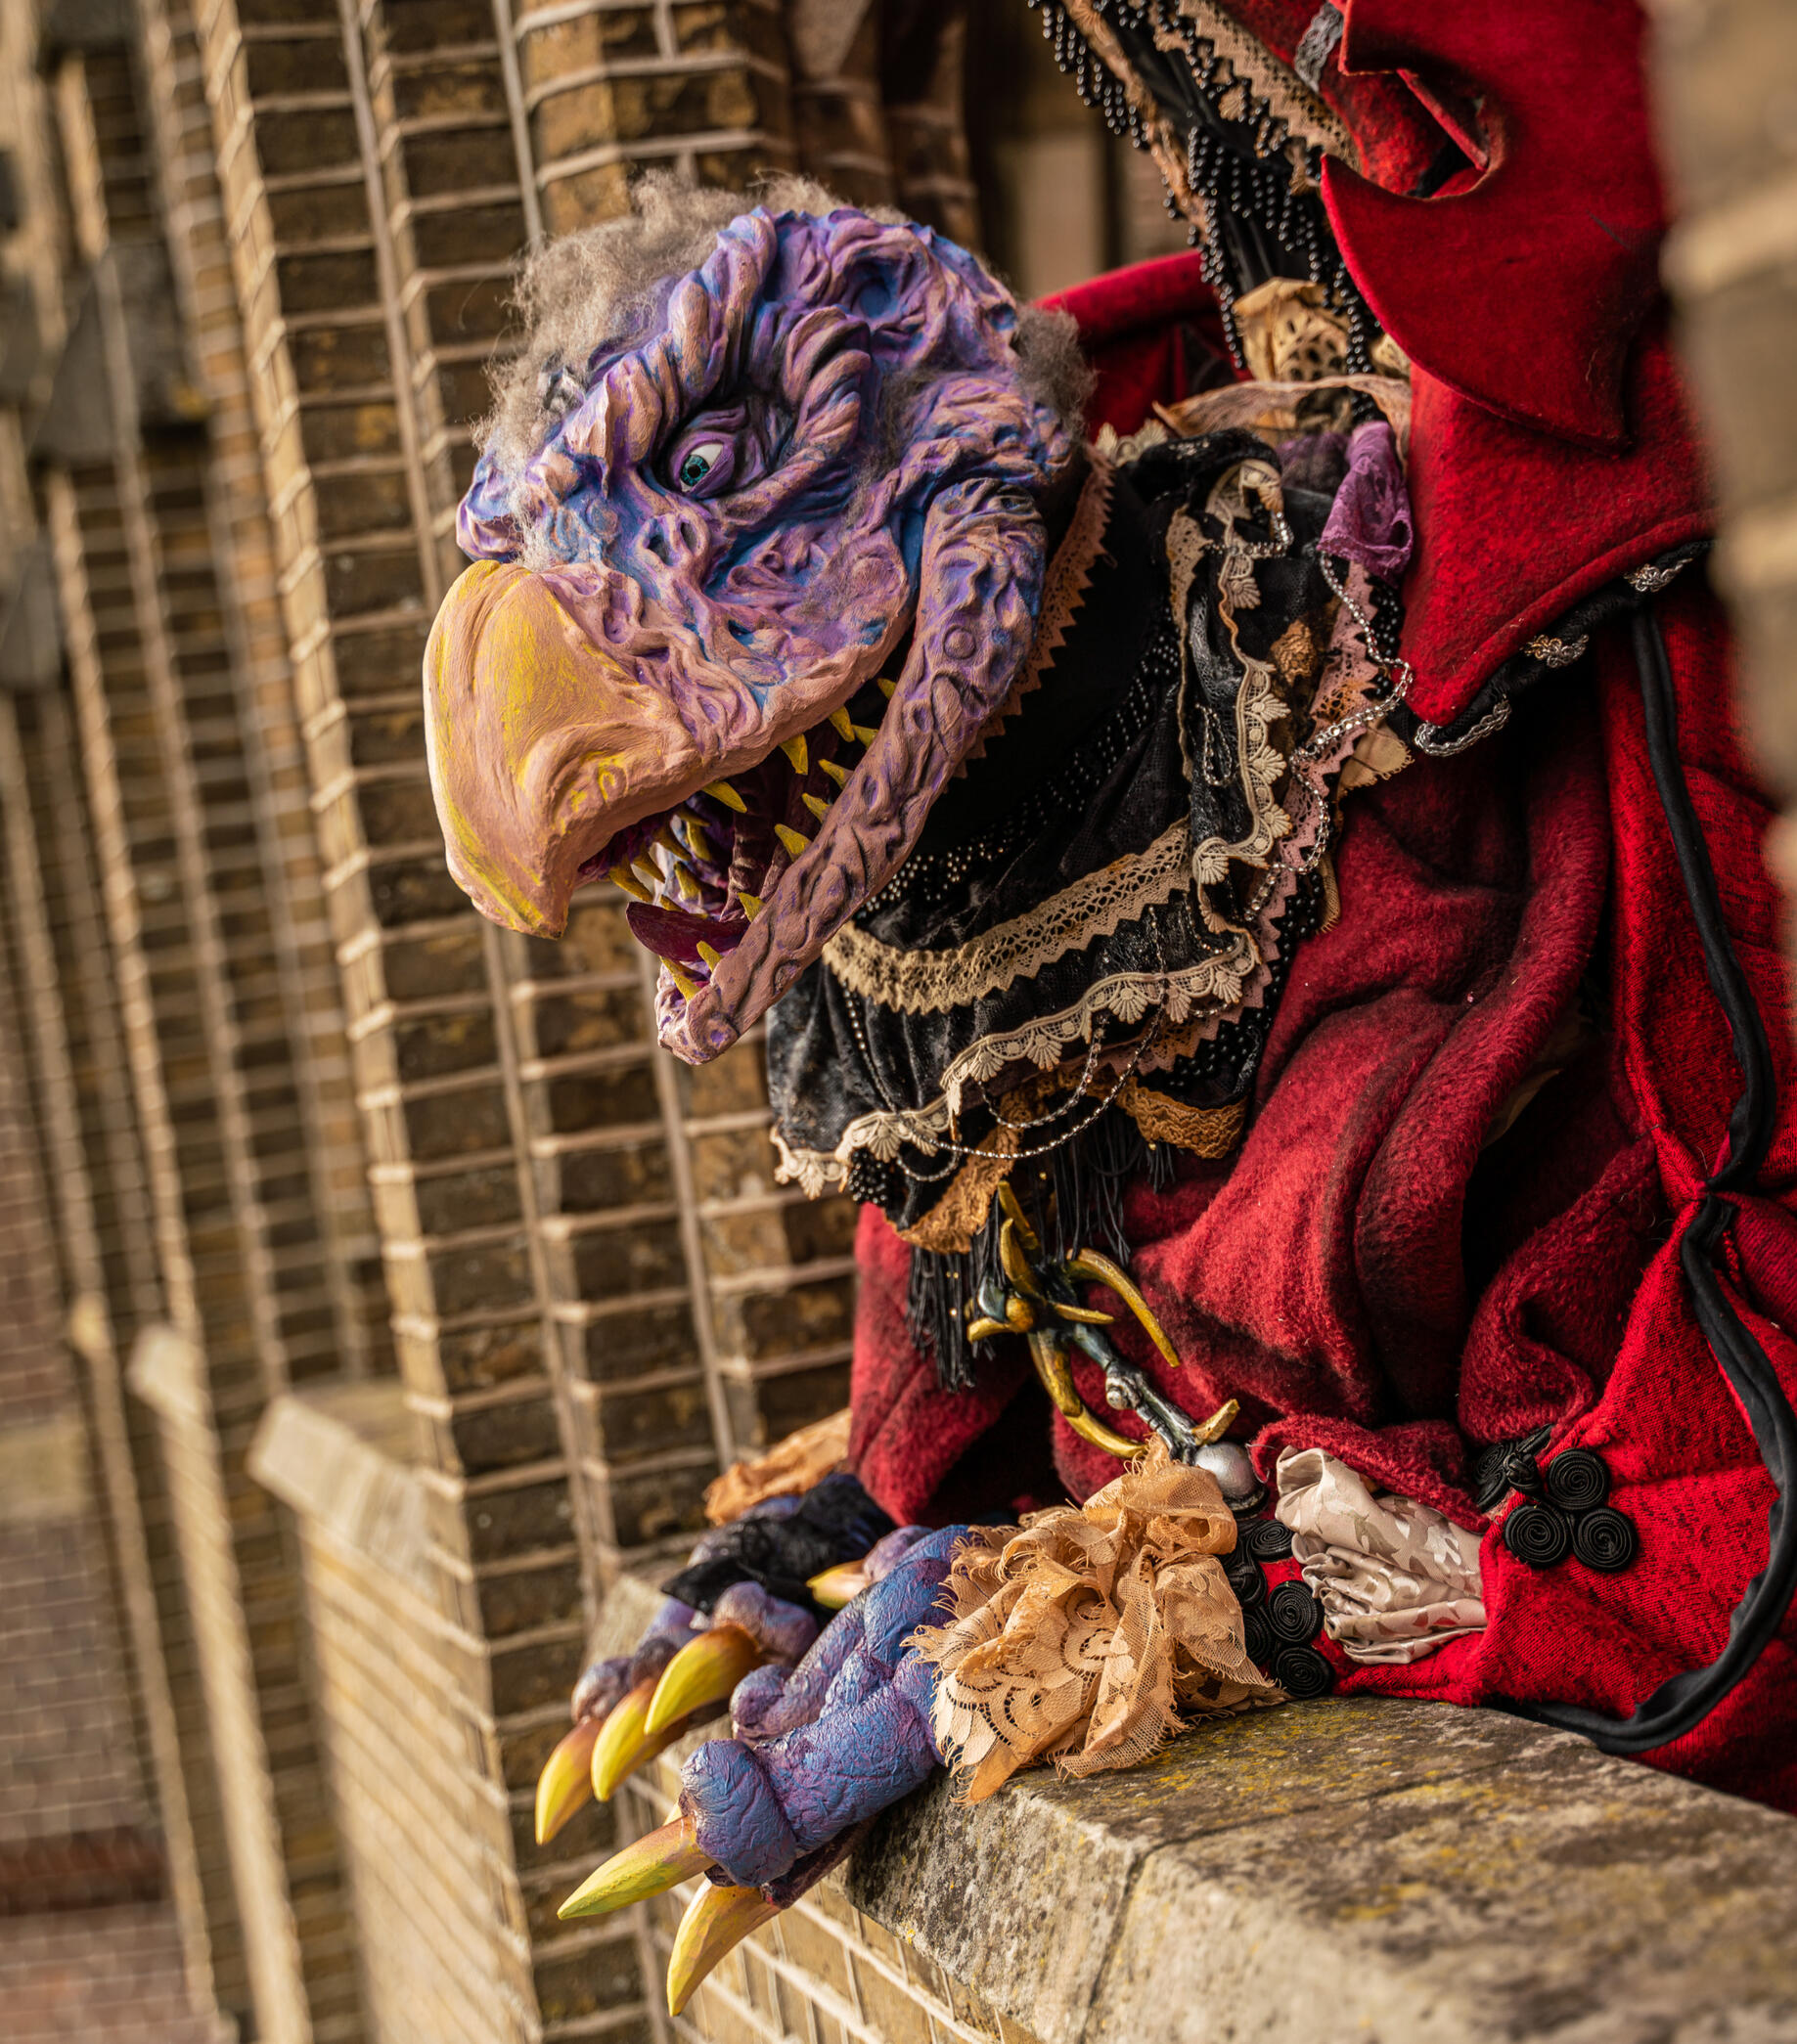
Making of Chamberlain
"It's about the process and not the result" is what comes to mind looking back at this costume.. As I only got to wear it one day (thanks covid)But man, did I enjoy the 4 month crafting journey of getting there.
May 2022
Traditional Sculptures and Artdolls

Vinny

Moon Knight Khonshu

Metroid Fusion SA-X

Metroid Ridley


Art and Illustration


Cosplay

Fallout T51 Raider

FNAF Springtrap

Monster Hunter

Pacific Rim Kaiju Drone

Metroid Dark Samus

AVP Grid Alien

Marvel Doctor Strange

Skyrim Dragonbone

Dark Crystal Chamberlain

Onmyoji TamamoNoMae


Toy Customs


3D Printing

The Yellow Rabbit Model by Me

Character Design and Model by Me

Wearable mask based on own Original Character. Model by Me

Alien Design and Model by Me

Tetsucabra Design and Model by Me

Godzilla Design and Model by Me

Torkoal model by Me

Character Design and Model by Me

Politoed Design and Model by Me

Model by Me. Design inspired by Clear_Eclair character

Samus by JONAAIR48 Base by me

Magneton by Fontoura3D and Terrain by ugurmete91

Dusknoir by Fontoura3D and Terrain by Alexguillen

Ludroth by TRI FIN STUDIO Base by me

Godzilla '98 by DP (Gambody)

Sylux by RIVINX


Resin Printers: Elegoo Mars 3 Pro | Saturn 3 | Filament Printer: Bambulab A1
Making of Vinny

Vinny's first Design - 2013

Vinny's Artdoll - 2021


It hasn't been a surprise to many that since the pandemic a lot of cosplay related events are cancelled. Especially in Europe, there hasn't been a comic con in about two years.This together with some other reasons made me lose interest in Cosplay alltogether. But by the end of 2021 I really had that itch to craft something again. I think I found the perfect mixed media artform that put all those self taught crafting skills to use. Here is my first artdoll, Vinny. Based on my favourite original character I drew up in 2013. Vinny has often been used as a mascot for the 'Roar and Clank' name I took online. I like to think of Vinny as a monster version of me ;)
I started out with making a sketch on paper... Which I didn't even use in the end. But having a little blueprint in front of me wasn't that bad to have. You gotta start somewhere.I took a lot of inspiration from artdoll makers on Instagram and Twitter. And thus I decided I wanted the face, hands and feet to be hard clay parts. They are mounted on tinfoil/iron wire frames.For the face, hands and feet I used two part Apoxie Sculpt. Which is clay you combine in two parts, and will harden on its own.
While I absolutely love this clay for being very soft and easy to get smooth.. It's also extremely heavy. Which is something I didn't account for in the beginning. This would prove to become quite a challenge later on.


As you can see in that third image. That was my first wireframe for the dude.. Which was just me taking over what I've seen people do online. What I didn't know however, is that a lot of dollmakers use Polymer clay. A clay type that is way lighter in weight than Apoxie Sculpt.But you learn by making mistakes. I managed to somewhat fix him upright by padding the wireframe with sheet filling. The kind of fleece you buy for filling up quilting projects.The dude managed to stand up at least!


And here you can see one of my own tricks I learned as a cosplayer. Something I'm actually quite proud of hehe. The shape and proportions of a character are extremely important. And I found a way how to make sure to keep myself in check on these.I take a proper picture of the project in its current state and simply draw over it digitally on my PC. If you cannot do this because you lack a drawing tablet, you could just scribble on the photo in your phone app really!I am also always aware that stylized 2D attributes don't always translate well in 3D. But Vinny's big gut, and pokemon-esque proportions were the most important to me.I ran out of sheet filling at this point. Which was actually a blessing in disguise. Because I was forced to use the heaps of Polyether foam (furniture foam) I had still laying around.


Polyether foam is the same foam you see used in Fursuits. And even better, in classic Tokusatsu monster suits (Godzilla, etc). Its incredibly versatile and so extremely easy to cut and glue together with either sprayglue or contact cement. You can even will it into shape with taking it to battle with a pair of scissors.Which is what I did to fill up my friend until I was satisfied with his chunk.Now to enter an old familiar into the mix; It was time for some eva foam armor.


I'd love to explain more about this part- But crafting with Eva foam comes so easy to me after all these years.. I simply freehanded my dude these gauntlets out of 5mm scrapfoam I had laying around. Because this is not a structure that requires hold a human body, the thickness and strength really doesn't matter anymore.Next up was the painting stage. All the paint I used on Vinny is acrylics. The most versatile, easy to get and use paint in my opinion. Do be careful that Acrylic paint really varies in quality from brand to brand. And this is always noticable by the price.My go to brand is Amsterdam.


And then it was pattern time. In which I made another big mistake.. But I wouldn't notice until later. (And I always manage to fix them anyways. no biggie)I covered Vinny in ducttape and divided the pattern into the segments. I would later use these to unwrap onto the faux fur fabric I bought for my fluffy friend.


What was really fun translating a 2D design of my own making to a 3D object is that I have to decide what materials, looks and textures I want certain parts to have.I decided on a latex covered tail for Vinny because of this. It would blend in well with his blue claws.First I made a sock for his tail using my pattern. The fabric I used was a thicker tricot. A 2-way stretch fabric that is perfect for soaking up liquid rubber latex.The latex I use is the one you can get your hands on the easiest. It's mostly used for face prosthetics. But has a wider range of applications. When dry, latex acts like rubber and will never fully harden in a way that will crack. Making a fabric coated in latex a skinlike, flexible sheet of rubber.There is multiple ways you can color your latex. For professional use you can buy color pigments which are made for latex.
I however just throw in acrylic paints. Acrylic paints, and especially the more expensive ones, have a formula that blends really well with latex.


And then the troubles began. I never saw these dollmakers use ducttape for patterning. And now I know why... I pulled holes into the polyether foam.. No matter how careful I was with pulling it off.So next time. I will be using painters tape first and ducttape on top.. Learn from my mistake haha....I took the gamble not to fill every hole. The fur was pretty fluffy on its own and I was pretty sure it wouldn't matter as soon as the fluff would go on. Speaking off....


Fluff! And luckily, said fluff hid all the gaps I accidently pulled into the polyether.Vinny's furcoat is made in parts (pants, arms and top/neck). It's not a doll you are stuffing. You are putting a skin onto an already stuffed doll. I did all sewing by hand. Just whatever stitch.. I am not very knowledgable about sewing yet. I simply turned the fabric inside out and sewed it together. I must admit I hotglued a lot of edges onto the polyether foam... I could've used a 'puppet' or 'Henson' stitch to connect the parts on the doll. But the fur is so thick I could uh- just use hotglue..the ears I made out of thin sheets of 2mm eva foam, with fur fabric glued ontop. The ears jammed into the neck with iron wires. Which makes the ears poseable by coincidence, ha!

Vinny's furcoat was in dire need of a trim, a comb and some subtle color variations.I noticed attacking the fur with scissors worked the best. But I have seen artists use thread clippers for this part. I will be trying that in the future myself.The slightly darker brown I airbrushed onto the fur. Just like all my other paints I prefer an acrylicpaint. I do use specific airbrush tailored acrylics however. I never liked dilluting them myself.


Vinny was still very much naked without his armor.. Which is actually not part of his body, but a seperate golden armor he likes to wear. Vain little bastard.To fit his gauntlets. These would also be made out of EVA foam.Just to make sure all the panels would fit into each other properly I made a very rough pattern. Not wanting to damage the fur, I slapped some tinfoil onto the boy and then covered that with ducttape. Worked good enough. The armor is mostly freehanded anyways.Before simply hotglueing the armor onto the fur I would paint it in the same hue of gold that I used previously on his gauntlets and faceplate.Because golden paint is always tricky and doesn't cover well with just one coat. I often tend to start with a basecoat of yellow. It makes the gold pop better!


There he is! Fully fluffed and armored! One very chunky happy boy~I made him in about a month and I couldn't be happier with the outcome. I learned more than I expected, which is always good. And the process was just as fun as the finished doll. Putting it down in a blog is also a new thing for me. I hope whoever may stumble across this page may also share in that bit of fun.The only thing I wish was better is the poseability. Sadly due to the wrong heavy claytype I had to reinforce the neck with extra thick iron wire. Taking away a lot of his articulation.But to me what matters most is that he looks better than I imagined he would. Its incredibly fun to have this old 2D creature finally see realized into 3D with all these different textures and colors not possible in a cartoony drawing. It creates a personal connection to a character just like Cosplay used to invoke for me. So I will for sure be making more artdolls in the future!~December 2021 - January 2022
Making of the Pacific Rim Jaeger Drone Kaiju

I fondly remember making and wearing this creature. This cosplay was purely made off the hype from the sequel trailer of my favourite movie Pacific Rim. The original monster appeared in the movie Pacific Rim Uprising - 2018I made this cosplay off 1 little trailer sequence at first. Basically one blurry screenshot. During the build, some toy pictures leaked online as well. In hindsight I am still incredibly surprised of how accurate it ended up being. Even the backside.This cosplay won 1st prize in a little 'walk on - walk off' contest at a gamer LAN-party.Costume was made in a month of non stop, daily building. Main materials are: Eva Foam, Upholstery foam, and isolation foam for the little models I ripped the patterns from. Paints are all acrylics and rattlecan.This is also the first project in which I included the visual thought process of digitally drawing on top of WIP pictures. A technique which i still use to this day!April - May 2018


Making of Dark Samus

Without any doubt. This is the biggest mark I will leave on this world. I probably cannot comprehend how many people saw this costume with how many online articles and social media reposts there are to find. One online search for 'Dark Samus Cosplay' and you will get what I mean. This cosplay went viral before it was even finished, eventually being shared in the tens of thousands.It is appropriate to me as a person however. Metroid is the piece of media that showed a little 11 year old girl that there can be a woman in the armor. I would not be the person I was today for that particular moment playing Metroid Fusion.When the Dark Samus redesign for the Smash bros. game was shown. I was sold.In this costume I pretty much put everything I learned from the Jaeger Drone Kaiju. Where I included some basic leds in the afformentioned costume, this is the one where it became a big feature of the end result.This cosplay was made as a companion piece to Willow Creative's Samus Aran Varia Suit from Prime 3 Corruption. Its where we truly became friends. And it was all rewarded with a first place on 2019's Dutch Comic Con's cosplay competition.

The costume was made in three months of non stop building. Eva foam for hard stuff, upholstery for the soft bits so I was able to move. All paints used for this project were acrylics and rattlecan.November 2018 - January 2019


At last I want to remind you to pay Willow Creative a visit~ Next to being extremely talented, she is actually still an active costumer ;)
Making of Skeksil the Chamberlain

The Dark Crystal's revival series sure reignited the love for the absurdist fantasy universe by many. And I was no exception.I fell in love with the scheming, evil yet charming Chamberlain. This and his outlandisch design would be a challenge for me to replicate. It was clear from the beginning that I had to turn a 9-man puppeteered puppet into a single person worn costume.Having to drastically alter my shape with frames, a fake tummy and the head elevated above my own.This is the last cosplay I made before covid hit and ultimately decided to stop with the artform alltogether. I do consider it the best thing I ever made.The costume was worn once at a photoshoot in January of 2020. Not soon after, the first costume events would be cancelled in the Netherlands. Not to return for the two years to come.While only been worn once. I have a lot of great pictures and a well documented build album to share with you.This is the biggest fabric project I ever tackled, and with it I overcame the fear of sewing. The costume's flesh bits also include pigmented liquid latex, another first for me.
I build it over the span of 4 months. Using my winter holiday to its fullest. 100 meters of fabric and a body altering PVC frame later.. Chamberlain stood proud! If even for a day.September 2019 - January 2020


Making of the Female Dragonplate Armor

Put on the 10 hour Skyrim ambiance by Night Mix on Youtube ladies and gents. Its time to pay homage to a very person defining video game studios.My first big armor cosplay was a Power Armor from Fallout 4 in 2016. Having learned a lot I since then I wanted to come back to Bethesda's great armor designs. My choice fell on the Female Dragonplate Armor. Designed by Johah Lobe, he even posted his praises to my cosplay when someone tagged him on twitter.Its all freehanded in Eva foam, including two weapons, the Dragonbone Axe and Sanguine's Rose.
This was also my first foray into sewing. I've sewn the under dress from Pleather. Hot? Yeah.Not only because of the Pleather. The first Photo shoot of this armor we did was in the Ardennes in Belgium. It was a record year for summer temperatures.. I shot this costume in 43 degrees celcius. I survived, evidently!February 2019 - April 2019


My deep dive into 3D Modeling for 3D printing
Teaching myself Blender and how to wrestle with 3D Printers ...In a year!

The First Model..

The Fourth Model

The Eight Model. 10 months later.


This 3D modeling thing I got into? As of June 2025 I've only been doing this for about 1 and a half years. I'm as surprised as you are, looking at the material. I hope my little adventure guides you as much as it warns you. That sounds a little ominous.. But believe me, if it was so much of a struggle I wouldn't have been doing it anymore.This blog is in no way a tutorial and I will be omitting too much techspeak and details like Blender shortcuts. I feel like diving right into that is intimidating and demotivating.I will however tell you how I learned these things and where to find this info. Spoilers: its Youtube (tutorials) and Reddit (troubleshooting)The order of things we're going trough will be Blender, 3D Printers and finishing a 3D Print.

The First Model..

The Fourth Model

The Eight Model. 10 months later.


Will it Blend(er)?
Okay okay, so you know a little bit about this whole thing and are asking me right away: Why Blender why not Zbrush or NomadSculpt.I am can tell you right away that Zbrush is way more suited for digital sculpting for 3D printing than Blender. This is mostly thanks to how the program allocates it's girlmathing power. You can create way more detailed models without your PC blowing itself into the stratosphere.
I simply went with Blender because the program is free and I didn't need to go trough the hassle of getting Zbrush in..... other means. The NomadSculpt answer is simple, I don't own an Ipad.But I also went with Blender because of the amount of people in my feed were using it. Mostly Five Nights at Freddy's artist love the program because it's a jack of all trades. You can model something and straight up animate it in the same program. This is the strength of the program.

So the first thing I did was open it and go navigated my way to the 'Sculpting' tab. Everything is extremely overwhelming. And I knew it was going to be. I have switched 2d art programs so often I got kind of used to how incredibly demotivating and overwhelming it is at first. So I just 'fucked around and found out' for my first thing. Just clicking and pressing all the tools to my disposal and look what they do to the object in the center.And remember that learning something has everything to do with your drive and motivation. I am over 30. And while picking up new things feels harder than it used to be. As long as you know how to learn new knowledge you'll do just fine ;)And here comes my first 'warning'. Aim small. Simple lil things. I am a year in and I still have not modeled a single human face. And that is with a reason. I still struggle drawing humans, let alone model them. I will get there, but for now sculpting monsters has been incredibly fun.I sculpted some heads from creatures because this stage was basically only just me learning the program. What the buttons do and what functions blender has for me to achieve my goal of making 3d printable models.


And this is where I learned the biggest hurdles that still challenge me one year later: Polygon counts, model rigging and assymetry.Im going to take rigging for my example here. I wanted to create a bust of William Afton from the Fnaf movie holding his knife in his very iconic pose. Except that meant I needed to sculpt the fingers to hold that knife.I simply tried sculpting the two seperate hands pre posed first. But by the nature of the program the fingers started to look very ugly and stretched. I already knew that I would have to 'rig' them. A rig in a model is an inner skeleton which the surrounding model sticks to. Making it able to manually pose things like fingers or limbs or even go as far as letting the program animate them for video and games.I got my ass to youtube and simply spend the whole day looking at blender rigging videos. Which is a bottomless pit, so please don't do that and search for 'rigging models for 3d printing'. Because it is very simple to only rig a hand for example. Leaving the rest of the body to be posed manually.


One of the biggest lessons you can learn when it comes to creative hobbies is learning how to google. Which is how I call it. Your best sources for information are Youtube, Reddit and Google in that order. You just need to know what to google. And when you have a new program and don't exactly know what certain functions are called that can cause irritation and eventually demotivation.Sometimes you need to close the program. Do some research and sit on it a day before getting back into it.Now there's still things I struggle with today. They mostly relate to polygon counts and my PC imploding on itself. This is not new to blender usage and there's not always a simple solution for it. 3D printer slicers can simply stop loading a model if it has too many polygons. Even if blender handled them fine.You have the ability to decimate the number of polygons in blender but the process itself makes my PC go trough some full hit cardio. Most of the time I do other things while waiting for models to decimate.Now that I have mentioned 3D printer slicers we are moving on to the realm of printing the models, but still stay software side for a little while.
Printing toys??? In THREE DEE? :O


Now we're moving on to actually printing these buggers. I am fully aware that talking about slicers before talking about the actual printers is backwards. But its a very short chapter and it feels correct to show how the bits and pieces of digital code and sculpt turns into a physical object.A slicer is the software that turns your digital 3D model (often a STL file) into a string of code that your printer understands. It churns out a file that tells your printer how to move, when to move, how long to turn on the UV light or how much plastic filament to lay down and where. There are a lot of slicers out there but really. Just use the one you're told when you buy your printer. You can always look further later.And yet again. All my troubleshooting regarding slicer issues were all helped by googling.Instead of youtube being the source of information however, it will be reddit. And that is what I wanted to highlight here. The most common issues you will run into are printbed adhesion problems. Then there's things like filament not coming out of your extruder properly. What I have learned is that most common printer failures are a combination of user and machine error. And eliminating the user error almost always fixes the issue.Reddit doesn't really have a good search function so basically google your issue and include the slicer and printer you are using.

There are a lot of different 3D printers on the market for both professional and at home use. I will only be talking about the two common printers for home use: FDM also known as Filament printing and SLA, better known as Resin printing.As seen in the image above, resin printing gives a cleaner look. But this comes with some buts- taking a regular resin, the print can be fragile when it includes thin parts. And the resin used for printing is a toxic liquid. After a print is done you need to clean this model in Isopropyl alcohol and then you harden the outer layer with more UV light. You need to wear gloves during this process at all times. So for that nice smooth finish you have extra steps and probably a substance you rather not work with.FDM is also known for being able to lay down colors better. Yes you can buy colored resin. But easily switching out colored resins is a pain, since you need to thoroughly clean out your printing vat. With FDM you can simply unload a colored spool and put in a different one.As of now FDM printing still shows more apparant layer lines than SLA. But the technology is advancing fast, those lines become less visible every new printer generation release every year.I use both. I started with Resin printing because my main interest is printing models and toys. Eventually I came around buying a filament printer as well because it allows me to make bigger models. I also want to add that testing your own concepts is easier to print in FDM because you barely have any post processing. You rip it off the plate and remove the supports if there where any.


Yeah you gotta paint this thang


Okay now the simple part right? I just smack on the paint I got in house no matter what kind right?very loud incorrect buzzerI mean. You can do that, but I've seen first had people trying to paint my prints without any further guidance... I learned a lot can go wrong here. So I'm going to give you some pointers ;)Yes. You need to prime your prints. If you are going to paint the complete figure you can use Gesso or a primer designated for model painting. But I found out a bit of hack. Because I can hear you ask "Don't you need to sand your printlines down first??"Yes. You do. But we don't have time for that. I noticed that a cheap woodfiller (like the one in the picture above) actually dillutes down with water AND mixes with acrylic paint. It even mixes with gesso and Vallejo primer. If you mix this stuff 1:1 with other ingredients you get a yogurt like consistency that easily brushes on and does a great job in filling the gaps between print lines. If you put down three coats the lines are barely visible unless you are looking at it from a 10 cm distance.But what if you need the color of the print to come trough certain parts? Spray a layer of matte clear varnish over your print. If you don't do this and paint directly on top of the surface the paint can sometimes bleed out into the plastic because of the layer lines. This will create a visible smudge you cannot remove.


Now I only want to give you some pointers on kinds of paint. The absolute best paint for 3D models is miniature paints. My preferred brand is Vallejo. What also works fine is acrylic paints from a tube (like Amsterdam) But for really small models or fine details I advise against these paints. Theyre designed for canvas and leave your paintstrokes visible. Model paints do not, they lay down incredibly flat. Its pretty magical.Another plus to model paints is that they are all suitable for airbrush use. They only need some 'airbrush thinner'. If a store carries lots of model paints, I'm sure they have that too.There are countless of painting techniques I will not go over right now. But I will give you the terms so you can google them on your pace: Drybrushing, (shadow) Washes, masking and Airbrushing.Finally. You want to protect your printed pieces from dirt and greasy fingies. Answer is simple; cheap rattlecan varnish from the dollar store (Action). Get both a matte and a glossy one! The overal finished look differs greatly from which one you use!


I can't believe that in my 30's I am still finding hobbies that click with me. 3d modeling and printing has become a new way of bringing my brain blasts to life.And now that I have become proficient in making standalone figures.. I have already started experimenting with using 3d printed parts in bigger mixed media projects... But more on that another time ;)Maybe you learned some thing or two with reading along.. I hope it inspires you to take a peek at the technology one day. If it's only Blender or getting into 3d printing. It's amazing all of this is possible these days on a rather low budget!One of the funniest consequences of me picking this hobby up is.. I spend a lot less money on buying figurines and statues. As I look at them and go "meh. I can make that myself."And you have no idea how inspiring and powerful that feels ;)
Making of the Handpuppets for Abunai! 2025

As a Dutch nerd there is this one constant. This one shared experience. The yearly convention Abunai!A little birdy had been tweeting in my ear... so I knew what the theme for the 2025 edition was going to be a little earlier. I nearly begged that little birdy if I could make something for the convention's opening movie. Knowing exactly what I wanted to make; Godziban inspired handpuppets. Taking Abunai!'s mascots and turning them into ferocious... but cuddly Kaiju.Something else has been itching me for a while. Creating puppets. And with the greenlight from the Abunai! team I went on a race against the clock. Making two handpuppets in a month.I combined all my known trades. Freehanded upholstery foam bodies partly coated with colored latex. The hard to freehand parts I modeled in Blender and printed on my Bambu. And theres even some Eva Foam in there.This project is my love letter to Abunai! And what the convention has meant to me troughout my life. I probably won't attend every edition in the future but I will rest easy knowing that I did something for Abunai!'s Legacy.March - April 2025


Contact
Thank you for supporting me!
Nederlands: Dankjewel voor het supporten van mijn werk! Wat je zojuist heb gekocht zijn 3d prints. Deze producten zijn door mij zelf geprint en dus niet te vergelijken met merchendise wat je koopt uit de winkel. Houd er rekening mee dat er onegiheden op het oppervlak kunnen zitten.-FDM Print is ongevervd maar gekleurd en bevat print lijnen. (deze prints hoeven niet geschilderd te worden, maar het kan wel)
-Resin Print is grijs of geverfd en bevat enkele gaatjes over het oppervlak.Voor het mooiste resultaat kan je na het schuren van het oppervlak de print bedekken met een 'primer'. Zowel goedkope spuitbus primers of Gesso (beide te koop bij Action) zijn prima!-Als je een Resin print heb gekocht zitten er over het hele oppervlak maar vooral op de onderkant gaatjes. Dit is omdat het object hol geprint is. Ik was alle objecten grondig in een alcoholbad maar er zal altijd wat vloeibare resin overblijven.Dit is absoluut niet erg, tenzij je de gaatjes dicht maakt. De vloeibare resin zal overtijd gassen ontwikkelen en na lange tijd (vaak na 2 jaar) zal de resin print simpelweg barsten door de interne druk.Wederom, vul de gaatjes aanwezig in de print niet.Het kan in sommige gevallen voorkomen dat je print een beetje lekt. Het zal gaan om weinig materiaal. Dit is makkelijk te verwijderen met een schoonmaak doekje of een doekje met wat alcohol. Als je resin op je handen krijgt direct wassen met handzeep. Het is niet gevaarlijk maar voorkom dat je het in je ogen wrijft.-Als je een FDM print heb gekocht en deze wil schilderen, wil je deze waarschijnlijk eerst schuren of ontdoen van de laag lijnen. Op het internet raden sommige mensen 'aceton verstuiving' aan. Ik raad dit af. Er komen ongelofelijk veel schadelijke stoffen vrij bij dit proces waar een simpele hobbyist niet de goede afzuiging en apparatuur voor beschikt.Je kan het object het beste schuren met schuurpapier. Ik raad het dragen van een simpel masker wel aan, want het gruis wat loskomt is in feite microplastic. Zet FDM prints niet in de zon. Ze kunnen gedeeltelijk smelten en dat zou heel erg zonde zijn natuurlijk.--Help mijn print is gebroken!En dit is gelukkig heel simpel op te lossen. Voor zowel je Resin en FDM print kan je deze makkelijk verlijmen met alle secondenlijmen op de markt. Hete lijm en contact lijm raad ik ten zeerste af.